
The Buick is on top of the ramps. Chocks are behind each rear wheel. From this position I was able to access the filler plug for the transmission.
All old cars have problems. Some problems are truly serious ones and others are purely cosmetic. My ’41 Buick had plenty of problems when I purchased it, but none of them prevented me from driving it 90 miles just to get home. That was a good start.
I decided to improve on the Buick and to put it to use as much as possible. I did not want a car that never saw daylight or the open road. My first priority was safety and that required a complete inventory of all issues with this 73-year-old car. I soon found out that the entire gas line was made of rubber, probably neoprene. That was not to my liking. Besides the fact that it was not original to the car, I also did not trust a soft line that was so long. My mechanic replaced the entire fuel line with steel. I found the correct clamps and grommets to assist this process and I also determined the correct path along the chassis that the line must follow.

This is the old fuel pump that was removed. I replaced it with a rebuilt one.
Of course a good fuel line is only one part of the gasoline delivery system. If you replace the line there are still plenty of other things that can go wrong. I found this out early on when the car broke down within one block of my home. I was out for a fun and uneventful ride (the best kind) when the car sputtered to a stop. I knew I had enough gas but unfortunately it was not getting to the carburetor. A good neighbor helped me push the car to the side of the road and my wife walked home, vowing to never ride in the Buick again. I don’t recall how I got the car back to my garage, but I did. After determining the fuel pump was not pumping I sent it off for a rebuild. The new rebuilt pump has been in place for several years now without any issues.

This is the gas tank as it appeared when I removed it. I cleaned it out, painted the exterior, and added new insulation under the hanging straps before putting it back on the car.
I also added an inline fuel filter (something that Buick did not do) so as to protect the pump and hopefully prevent another failure. As an additional precaution I removed the gas tank and had a local garage clean it out.
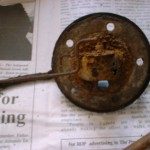
This is the underside of the toasted fuel level sending unit. The photo is out of focus but it does display nice rust!
They did a terrible job, leaving all sorts of stuff rattling around inside. So, I completed the task myself and finished off by painting the tank and installing a new gas gauge sending unit (the old one looked like it was dug up from a 1920 junk yard).
The gas gauge was a real trip. I tested the sending unit while the tank was still off the car. I applied power directly with a wire run from the battery. All worked well as the dash gauge responded nicely to my every up (empty) and down (full) movement of the float arm. That is it worked until I finally re-installed the gas tank and filled it. The dash gauge still remained stuck at 1/4 full. The addition of a separate ground wire to the fuel tank did not help. I do not detect any voltage on the line going to the gauge, so the next step will involve running a new wire back from the dash.
Then there are the jobs that require getting way under the car. Some time ago I purchased two nice car ramps to make this possible. They are the kind that you drive the car up so that it will be elevated some 10-12 inches. I need all of those inches to get under a car! The ones I purchased are called Rhino Ramps. They are made of a heavy-duty plastic and they can nest into each other for storage. (Amazon (see link) currently has them for $10 less than I paid.)
The problem was that I was a bit timid about driving the Buick up on the ramps. My car has a 3-speed column shift and it shifts into first with some reluctance. It’s a touch and go thing between the clutch and the throttle. The total distance to travel up the ramps is less than 3 feet. Once you get to the top the car must be stopped immediately or it will plunge over the end. This is easy to control with a watchful helper and an automatic transmission. I had the helper (my reluctant wife – reluctant to help, not to be my wife). I did not have an automatic.
I got the ramps pushed up against the front wheels before starting the car. It would be easier to get the car moving well and then just drive up but the chances of me missing the ramps was too great. I would have to engage the clutch and climb at the same time while being ready to brake immediately when my wife indicated I was at the top. It took three tries. On the third try I was perched at the peak of the ramp with my foot clamped down on the brake. I had the hand brake on too, but of course that only slows progress. It doesn’t actually stop anything. As I held the car steady my wife ran around the back and put chocks under the rear wheels. I warned her not to get behind the car! At this point I had made her far more nervous than I usually do. That’s pretty nervous!

This is a view of the transmission from the right (passenger) side of the car. The square bolt head at the top is the filler plug. Remove that, squeeze in hydraulic fluid until it leaks out. The only way I could reach this was by lifting the car.
When I was satisfied that all was stable I located the fill hole for the transmission fluid and cleaned up the area with some paper towels. My transmission fluid tends to leak easily. I suspect it is coming out the junction where the torque ball hooks on to the back of the transmission. It’s a big job to replace the seals that go there (the entire rear end has to be dropped from the springs, part of the brake line must be disconnected, etc.). If I ever determine that this is the place leaking I will have someone do it. I don’t do heavy stuff. In the meantime I will get out my bottle of hydraulic fluid and squeeze it into the transmission filler. I did this until the stuff started to come back out. Done! Hopefully I won’t have to do this again for a while. Maybe I’ll come up with a safer way to climb those ramps too?
Note: Clicking on an image will enlarge it. To return, use your <Back> key. If this article was of use to you please consider telling others about it by using the social media links. Also, if you provide your email and click on “Subscribe” (bottom of column to the right) you will be informed by email of new posts. Your email will not be shared with anyone else. Thank you!


Maintaining the 1941 Buick Roadmaster
The Buick is on top of the ramps. Chocks are behind each rear wheel. From this position I was able to access the filler plug for the transmission.
All old cars have problems. Some problems are truly serious ones and others are purely cosmetic. My ’41 Buick had plenty of problems when I purchased it, but none of them prevented me from driving it 90 miles just to get home. That was a good start.
I decided to improve on the Buick and to put it to use as much as possible. I did not want a car that never saw daylight or the open road. My first priority was safety and that required a complete inventory of all issues with this 73-year-old car. I soon found out that the entire gas line was made of rubber, probably neoprene. That was not to my liking. Besides the fact that it was not original to the car, I also did not trust a soft line that was so long. My mechanic replaced the entire fuel line with steel. I found the correct clamps and grommets to assist this process and I also determined the correct path along the chassis that the line must follow.
This is the old fuel pump that was removed. I replaced it with a rebuilt one.
Of course a good fuel line is only one part of the gasoline delivery system. If you replace the line there are still plenty of other things that can go wrong. I found this out early on when the car broke down within one block of my home. I was out for a fun and uneventful ride (the best kind) when the car sputtered to a stop. I knew I had enough gas but unfortunately it was not getting to the carburetor. A good neighbor helped me push the car to the side of the road and my wife walked home, vowing to never ride in the Buick again. I don’t recall how I got the car back to my garage, but I did. After determining the fuel pump was not pumping I sent it off for a rebuild. The new rebuilt pump has been in place for several years now without any issues.
This is the gas tank as it appeared when I removed it. I cleaned it out, painted the exterior, and added new insulation under the hanging straps before putting it back on the car.
I also added an inline fuel filter (something that Buick did not do) so as to protect the pump and hopefully prevent another failure. As an additional precaution I removed the gas tank and had a local garage clean it out.
This is the underside of the toasted fuel level sending unit. The photo is out of focus but it does display nice rust!
They did a terrible job, leaving all sorts of stuff rattling around inside. So, I completed the task myself and finished off by painting the tank and installing a new gas gauge sending unit (the old one looked like it was dug up from a 1920 junk yard).
The gas gauge was a real trip. I tested the sending unit while the tank was still off the car. I applied power directly with a wire run from the battery. All worked well as the dash gauge responded nicely to my every up (empty) and down (full) movement of the float arm. That is it worked until I finally re-installed the gas tank and filled it. The dash gauge still remained stuck at 1/4 full. The addition of a separate ground wire to the fuel tank did not help. I do not detect any voltage on the line going to the gauge, so the next step will involve running a new wire back from the dash.
Then there are the jobs that require getting way under the car. Some time ago I purchased two nice car ramps to make this possible. They are the kind that you drive the car up so that it will be elevated some 10-12 inches. I need all of those inches to get under a car! The ones I purchased are called Rhino Ramps. They are made of a heavy-duty plastic and they can nest into each other for storage. (Amazon (see link) currently has them for $10 less than I paid.)
The problem was that I was a bit timid about driving the Buick up on the ramps. My car has a 3-speed column shift and it shifts into first with some reluctance. It’s a touch and go thing between the clutch and the throttle. The total distance to travel up the ramps is less than 3 feet. Once you get to the top the car must be stopped immediately or it will plunge over the end. This is easy to control with a watchful helper and an automatic transmission. I had the helper (my reluctant wife – reluctant to help, not to be my wife). I did not have an automatic.
I got the ramps pushed up against the front wheels before starting the car. It would be easier to get the car moving well and then just drive up but the chances of me missing the ramps was too great. I would have to engage the clutch and climb at the same time while being ready to brake immediately when my wife indicated I was at the top. It took three tries. On the third try I was perched at the peak of the ramp with my foot clamped down on the brake. I had the hand brake on too, but of course that only slows progress. It doesn’t actually stop anything. As I held the car steady my wife ran around the back and put chocks under the rear wheels. I warned her not to get behind the car! At this point I had made her far more nervous than I usually do. That’s pretty nervous!
This is a view of the transmission from the right (passenger) side of the car. The square bolt head at the top is the filler plug. Remove that, squeeze in hydraulic fluid until it leaks out. The only way I could reach this was by lifting the car.
When I was satisfied that all was stable I located the fill hole for the transmission fluid and cleaned up the area with some paper towels. My transmission fluid tends to leak easily. I suspect it is coming out the junction where the torque ball hooks on to the back of the transmission. It’s a big job to replace the seals that go there (the entire rear end has to be dropped from the springs, part of the brake line must be disconnected, etc.). If I ever determine that this is the place leaking I will have someone do it. I don’t do heavy stuff. In the meantime I will get out my bottle of hydraulic fluid and squeeze it into the transmission filler. I did this until the stuff started to come back out. Done! Hopefully I won’t have to do this again for a while. Maybe I’ll come up with a safer way to climb those ramps too?
Note: Clicking on an image will enlarge it. To return, use your <Back> key. If this article was of use to you please consider telling others about it by using the social media links. Also, if you provide your email and click on “Subscribe” (bottom of column to the right) you will be informed by email of new posts. Your email will not be shared with anyone else. Thank you!
Share this: