Last year I took up kayaking as an exercise activity. In other words it is a way to exercise and not get bored. I have found that the sport has its ups and downs.
I first had to purchase a kayak. I found that most of the nice condition boats on the used market were priced at about 75% of market price. What to do? Purchase a boat from a recognized dealer during their season-end sale. I was able to get just the boat I wanted (a very stable 12-foot Wilderness Systems Pungo) from the Kayak Center of Rhode Island in Wickford, RI. Their price was very reasonable, the salesperson was able to confidently answer all my questions and they had my color, yellow!

The 12-foot Pungo atop the Packem racks. Note that the open side is facing out. I now have the racks turned around with the short open side facing inward. I found this easier to manage. Since I never dismount the kayak from the side it does not make any difference.
The next hurdle was transport of the boat. I have a 2007 Honda Ridgeline pickup truck. The bed, at only 5 feet long, is too short to secure a 12 foot kayak to my satisfaction. So, I purchased a OEM Honda roof rack and installed it. Then I got some inexpensive J-bar racks from Packem Racks. The J-bar racks are quite sturdy and attached nicely to the Honda. Unfortunately the 60-65-pound Pungo is a bit heavy for me to easily get on top of the roof. My first attempts resulted in scratching the roof and at one point almost rolling the kayak off one side. I solved this problem by making a roller rack that sits just below the rear of my roof rack. This, combined with an old towel, allows me to easily place and then roll the kayak up onto the roof rack. I also purchased a small cart that I use to transport the boat to and from the water and my shed. It only cost about $25.00 at a local Ocean State Job Lot that offered a deep discount to seniors (that’s me) on a special sale day.
The final hurdle was storing the kayak. I purchased two wall-mount J-bars and screwed them to the inside of the shed wall. Unfortunately I found it very difficult to lift the kayak onto them even when they are mounted about 4 feet up. The J-configuration effectively raises the height I have to overcome. It was always a struggle to overcome the upper body arthritis to get the kayak onto the rack. The plastic mounting hardware for these units also broke (eBay dealer did replace broken pieces). I do not recommend buying this type of rack.
After searching for plans to make a more muscle-friendly rack I found a company that had low profile racks (easy to lift over) made of wood. I decided to copy their design and make my own. They were not that difficult to make. I created the profile by forming a piece of stiff wire around the hull of the kayak. This created the optimum contour for the rack. The new racks firmly hold the kayak on its side – there is no wobble and no need for accessory ties. I used lag bolts throughout to hold it together. The accompanying photographs will give you an idea as how to design your own. My cost for materials (2×4 and 2×6 boards, lag bolts) was zero since it all came from my scrap supply.

The two suction cup mounts (don’t recall what they were made for) have been modified. I removed one lock on the end of each, threaded in a piece of PVC and covered the PVC with part of a pool noodle. The towel was added to prevent scratching of the roof.
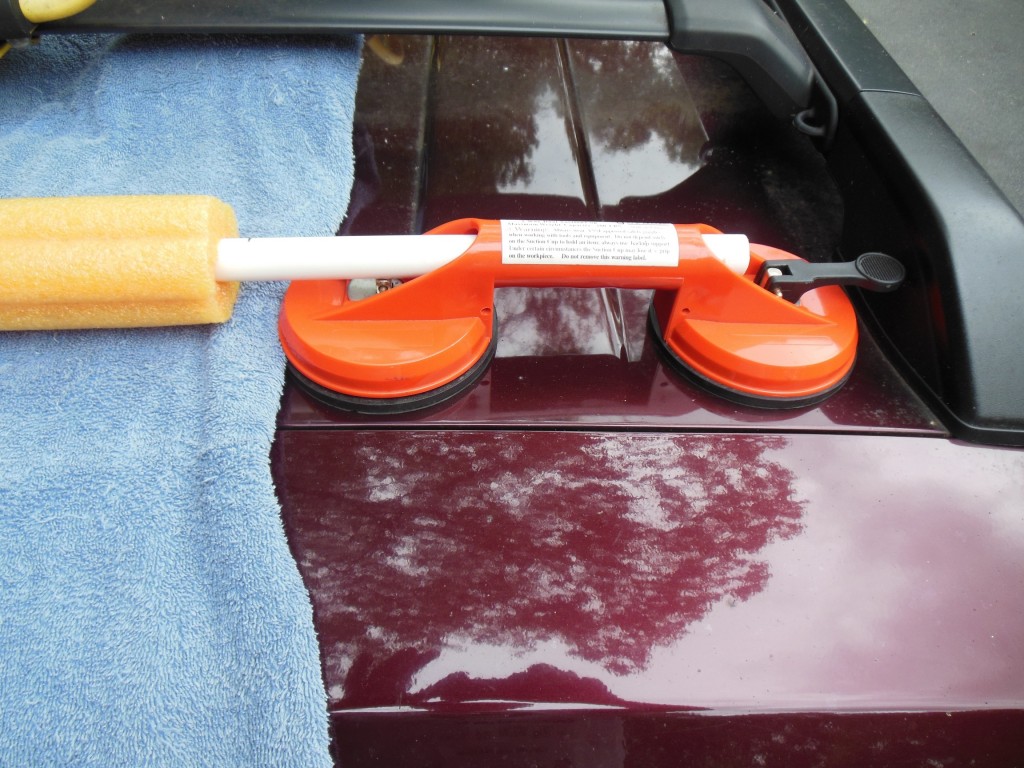
A closeup of the rack assist. This unit allows me to ease the kayak onto the roof while rolling it forward onto the J-bar racks. Only the outer suction cups clamp down (and yes, they do sometimes come loose ; this is a curved roof).

I would never buy these again. The quality is poor, the fit is not precise and it is difficult to lift a kayak over the front support.
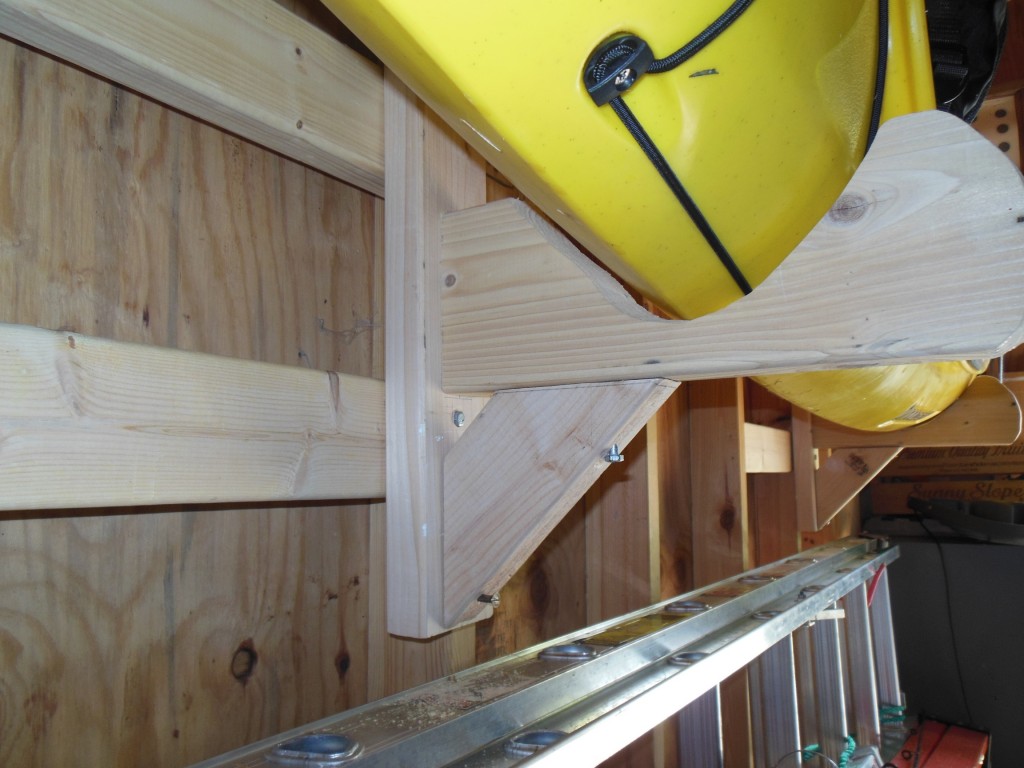
I copied this rack from one I saw for sale online. The vertical piece (about 20″ long) and the angled support are made from 2×4. The horizontal arm is from 2×6. Lag bolts hold it together. The contour is fitted to my boat so it is very stable.


A Better Kayak Rack
Last year I took up kayaking as an exercise activity. In other words it is a way to exercise and not get bored. I have found that the sport has its ups and downs.
I first had to purchase a kayak. I found that most of the nice condition boats on the used market were priced at about 75% of market price. What to do? Purchase a boat from a recognized dealer during their season-end sale. I was able to get just the boat I wanted (a very stable 12-foot Wilderness Systems Pungo) from the Kayak Center of Rhode Island in Wickford, RI. Their price was very reasonable, the salesperson was able to confidently answer all my questions and they had my color, yellow!
The 12-foot Pungo atop the Packem racks. Note that the open side is facing out. I now have the racks turned around with the short open side facing inward. I found this easier to manage. Since I never dismount the kayak from the side it does not make any difference.
The next hurdle was transport of the boat. I have a 2007 Honda Ridgeline pickup truck. The bed, at only 5 feet long, is too short to secure a 12 foot kayak to my satisfaction. So, I purchased a OEM Honda roof rack and installed it. Then I got some inexpensive J-bar racks from Packem Racks. The J-bar racks are quite sturdy and attached nicely to the Honda. Unfortunately the 60-65-pound Pungo is a bit heavy for me to easily get on top of the roof. My first attempts resulted in scratching the roof and at one point almost rolling the kayak off one side. I solved this problem by making a roller rack that sits just below the rear of my roof rack. This, combined with an old towel, allows me to easily place and then roll the kayak up onto the roof rack. I also purchased a small cart that I use to transport the boat to and from the water and my shed. It only cost about $25.00 at a local Ocean State Job Lot that offered a deep discount to seniors (that’s me) on a special sale day.
The final hurdle was storing the kayak. I purchased two wall-mount J-bars and screwed them to the inside of the shed wall. Unfortunately I found it very difficult to lift the kayak onto them even when they are mounted about 4 feet up. The J-configuration effectively raises the height I have to overcome. It was always a struggle to overcome the upper body arthritis to get the kayak onto the rack. The plastic mounting hardware for these units also broke (eBay dealer did replace broken pieces). I do not recommend buying this type of rack.
After searching for plans to make a more muscle-friendly rack I found a company that had low profile racks (easy to lift over) made of wood. I decided to copy their design and make my own. They were not that difficult to make. I created the profile by forming a piece of stiff wire around the hull of the kayak. This created the optimum contour for the rack. The new racks firmly hold the kayak on its side – there is no wobble and no need for accessory ties. I used lag bolts throughout to hold it together. The accompanying photographs will give you an idea as how to design your own. My cost for materials (2×4 and 2×6 boards, lag bolts) was zero since it all came from my scrap supply.
The two suction cup mounts (don’t recall what they were made for) have been modified. I removed one lock on the end of each, threaded in a piece of PVC and covered the PVC with part of a pool noodle. The towel was added to prevent scratching of the roof.
A closeup of the rack assist. This unit allows me to ease the kayak onto the roof while rolling it forward onto the J-bar racks. Only the outer suction cups clamp down (and yes, they do sometimes come loose ; this is a curved roof).
I would never buy these again. The quality is poor, the fit is not precise and it is difficult to lift a kayak over the front support.
I copied this rack from one I saw for sale online. The vertical piece (about 20″ long) and the angled support are made from 2×4. The horizontal arm is from 2×6. Lag bolts hold it together. The contour is fitted to my boat so it is very stable.
Share this: